TommyLog TECH – PowerSkin PoP’n2 Battery Charger

PoP'n2 Battery RechargerHey kids, for today’s TommyLog Tech, I want to introduce you to the Pop’n Battery Charger model 4000 from my friends at PowerSkin.

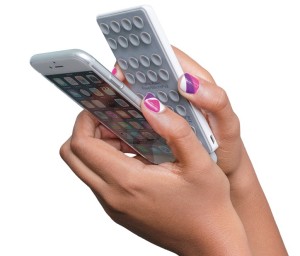
The Pop’n2 is unlike other rechargeable batteries on the market today. You have either external batteries that need to be tethered to your USB charging cables or the other style is where the added battery storage is built into an external case. Each style has its pluses and minuses –but the PoP’n2 is completely different. The PoP’n2 suction cups itself to the back of your iPhone. It comes with a totally ingenious lightning connector to connect the battery to your iPhone. The suction cups do a great job holding the battery in place. You have to really pry the battery apart from the phone. It’s a lot more secure than it appears.

The Pop’n2 has a 4000 mAh lithium polymer battery. Compared with your 1810 mAh that’s inside the iPhone 6, PowerSkin says you recharge you iPhone 6 1 ½ times per charge. I saw a little better than that, but your mileage will very. The build quality of the Pop’n2 is excellent.

The PoP’n2 comes with a micro USB cable for charging the battery as well as a clear iPhone 6 case to use if you don’t already have one. The clear case isn’t anything special and doesn’t give you much more protection than against simple bumps and scratches. You certainly do not need to use the case as the PoP’n2 works just fine suctioning to the back of a bare iPhone. I even found it fits my old IPhone 5 and 5S models just fine too. I also found that the battery suctions to many different iPhone cases I tried, so replacing your pricy case may not need to happen.

The Pop’n2 by PowerSkin is totally Tommy Approved and is part of my tech arsenal when on the road or away from power for an extended period of time.

For more information on how to get your very own Pop’n2 by PowerSkin, Here’s a link http://www.power-skin.com

[DISCLAIMER — I’m was lucky enough to be gifted a PoP’n2 by PowerSkin to test and share. All my words are original and my own.]

TommyLog TECH – Surfing Safely with a Verizon Mobile Hotspot #VZWBUZZ #AD

WIFI SecureHey gang, for today’s TommyLog Tech, I want to talk about being safe while on the traveling on the road. For those who are frequent travelers by air, you know there are many safety checkpoints along the way. Make sure sure that all your gels and liquids are in a clear zip-lock bag, please empty your pockets, take off your shoes and belts and put your laptops in the bins. You all know that TSA security checkpoint drill.

But how many of you are as safe on the road when it comes to surfing the web? Free public WIFI is available wherever you go from the airport, to your hotel rooms to the local coffee shop. While this Internet access is free and plentiful, it may not be without prying eyes. You need to always play heads up ball when using public WIFI and follow these 6 simple rules found in this article from Verizon Wireless:

1. Protect yourself by avoiding credit card transactions while using unencrypted Wi-Fi hotspots—such as those offered free in many businesses and restaurants.
2. It’s recommended that you send personal information only to web sites that you trust and that are fully encrypted (indicated by an https at the beginning of the address).
3. Log out of the sites you visit, and turn off Wi-Fi connections when not in use.
4. Yes, it’s a pain, but be sure to create a unique password for every site you use. In the event that a hacker does obtain your login credentials, this practice will limit their access to only one of your sites, not all of them.
5. For added safety, install browser security add-ons or plug-ins on your device, and consider using a virtual private network (VPN) that adds encryption between your device and the Internet—even over unsecured networks.
6. Finally, make sure your computer has the latest firewall software, security patches and software updates.

Surfing the Internet safely while on the road by using the Verizon mobile hotspot on my Samsung Galaxy Note 3 is totally Tommy Approved!

Verizon has more information on how to stay safe while using WIFI on the road. HERE

[DISCLAIMER — I’m one of the cool kids who has been asked to play with and test technology for Verizon. They asked me to test and share my thoughts. All my words are original and my own.]

VZWBUZZ Badge

TommyLog TECH – DROID TURBO by Motorola – Unboxing Video #VZWBUZZ #AD

Hey gang for today’s TommyLog Tech, I would like to introduce you to the “hot off the presses, you’ll see it first here” – DROID TURBO by Motorola. This yummy tech goodness was provided by my good friends at Verizon!

There are just so many tasty morsels to talk about here I don’t even know where to start. Before I dig into the features, I want to show you what’s included in the box and give this latest piece of tech a visual walk through.

Stay tuned to my next TommyLog TECH as I set up and play with the DROID TURBO lets see if it’s Tommy Approved!

For more information on how to get your very own DROID TURBO by Motorola, Here’s a link http://www.verizonwireless.com/smartphones/droid-turbo/

[DISCLAIMER — I’m one of the cool kids who has been asked to play with and test technology for Verizon. They asked me to test and share my thoughts. All my words are original and my own.]

VZWBUZZ Badge

TommyLog TECH – Setting Up The HTC One (M8) Is A Breeze! #VZWBuzz #AD

In a previous edition of TommyLog TECH, I raved about the beautiful HTC One (M8) with its curved lines and aluminum goodness.  For today’s TommyLog TECH I want to show you how easy it is to set up your new phone. This has to be the simplest setup I have ever encountered in an Android OS phone.

HCT One (M8)_2As you well know, I’m a huge IOS fan and have always thought that IOS was the gold standard for ease of setting up devises. Well my solid foundation has shaken a bit after seeing how easy the HTC One is to set up…truly amazing.

Once you open your new phone, you will be asked to login or create a Google account. Next step, you will want to connect to WIFI as there are loads of updates to download. You can download them too over your mobile plan, but be prepared as it will eat up a lot of data. What happens next takes configuring to a whole new level. You will be presented with a website www.start.htc.com and given a code. Go to that site and enter your code. You will then be able to configure your phone from the comfort of your web browser. You pick the phone and the carrier then you pick an interest category like sporting, photography, social media, gaming or others to begin tailor the phone to your liking. From there you are given a host of news and information categories for your BlinkFeed. Next you’ll be given the option of preselecting apps to add to your HTC One. You are now given options to select ringtones and notification tones to give your HTC that personalized feel. and even upload custom ringtones if you have any.

This is such a cool feature! How many people get a new phone, set it up and then say ”Okay, now what?” Well HTC has an answer for that. A few button clicks and bam! The apps you just chose and selected start downloading to your HCT One…just like that its all set up to your liking, background screen, ringtones, bookmarks and all.

HTC has really thought this one through. They made it super simple to setup and customize your HTC One, what a pleasure. Setting up the HTC One (M8) totally 100% Tommy Approved!
For more information on how to get your very own HTC One M8 from Verizon, Here’s a link http://www.verizonwireless.com/b2c/device/smartphone/htc-one?&zipRdr=y

[DISCLAIMER — I’m one of the cool kids who has been asked to play with and test technology for Verizon. They asked me to test and share my thoughts. All my words are original and my own.]

VZWBUZZ Badge

TommyLog TECH – Setting Up the NETGEAR NightHawk X6 Tri-Band WIFI Router #NETGEAR

Hey kids, for today’s TommyLog TECH, I continue my look at the NETGEAR AC3200 Nighthawk X6 Tri-Band WiFi Router I welcomed to the TommyLog TECH labs a week ago with this unboxing video.

For this edition I want to see how easy it is to setup and get surfing on the Internet as well as take a look at some of the tools NETGEAR has supplied to configure the X6.

Setting up the X6 could not be easier. I just needed to plug in the power cord and wide area network WAN Ethernet connection from my cable modem and press the power button. I then used my MacBook Pro and WIFI connection to finish the setup. Once I selected the default NETGEAR SSID from my WIFI Network drop down, entered default password I was good to go. NETGEAR conveniently supplies the SSID info and password on a removable sticker on the top of the router plus it’s etched onto the bottom of the router, nice touch!

NOTE: I always suggest changing your default SSID and passwords. Leaving these unchanged is just asking for some trouble. Make sure to write them down in a safe secure place. For BEST results, keep the SSID and passwords of the 5G networks the same.

Once the WIFI connection was established, my open Firefox browser took right over and began to setup the router and then detected the Internet connection. Zero user interaction at all. BOOM! The setup even “phones home” to see if there was a newer version of firmware and alerted me that there was. It showed the bug fixes and features and allowed me to do it now or defer. I chose to install now. The firmware downloaded and updated and the router rebooted– all in one effortless motion. After a slight delay while the router rebooted, I was on the Internet. THAT’S IT! The X6 now pointed me to download the Macintosh version of NETGEAR genie app. I downloaded that as well as the genie app for my iPad. It’s available for bother mac and PC as well as IOS and Android. The IOS app happens to be universal, bonus!

NETGEAR_genie
Once you launch the NETGEAR genie app, you log in and there you have a plethora of settings and information. You can edit your SSID and passwords to all your networks. You can turn on and off guest WIFI access. There’s a network map area where you can see all the attached devises, see their connection speed, even block them from the network. I personally like the parental controls area where you can set up filters for different types of sites. You can block phishing sites, social media site, sites with adult content and tobacco, etc. One feature you will love is the ability to limit the amount of bandwidth you use. If you are on a metered monthly plan, this is a must. You can see how much bandwidth you have used in a given period as well as your average usage.

The NETGEAR genie app has many other features and tools I didn’t even dive into like setting up a network shareable printer or USB hard drive share. It even lets you find and stream media on your network.

From box to surfing the net in less than 5 minutes including a firmware update– The NETGEAR AC3200 Nighthawk X6 Tri-Band WiFi Router is totally Tommy Approved!

For more information on how to get your very own NETGEAR AC3200 Nighthawk X6 Tri-Band WiFi Router http://www.netgear.com/home/products/networking/wifi-routers/R8000.aspx

[DISCLAIMER — I was asked to test tech stuff from NETGEAR. They asked me test and share my thoughts. All my words are original and my own.]

NETGEAR